Having written the original Raspberry Pi and Motion (Weather App Pt 2) and promptly put it on the back burner (read: got lazy and didn’t finish it) I’ve come back to finish it off.
Firstly, I’m going to can the webcam in favour of the Raspberry Pi Camera Module. This is mainly due to the fact that a lot of webcams either;
- Don’t work due to lack of driver support
- Can’t perform at their optimal resolutions again because of shoddy drivers
- Require an external USB hub in order to have enough power to work
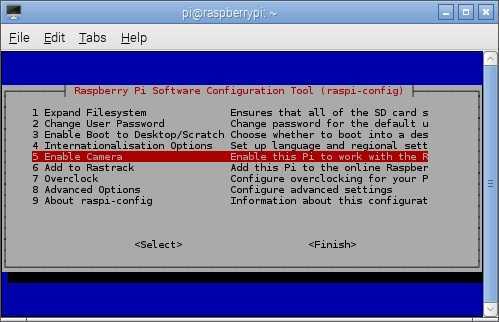
So after jumping on Amazon and purchasing the module I got to work setting it up on the Raspberry Pi. There isn’t much to it as it just plugs into small slot behind the ethernet port (pull the tabs out, slide the module in, and shut the tabs). Once you’ve got to that point you need to enable the camera. So power on the Pi and once logged in type the following;
sudo raspi-configMid-way down the list of options you’ll see the option to Enable the camera. Do so, and then reboot the device. NB: If you can’t see that option then you need to run update/upgrade on the device first.

In order to test out the camera simply run the following command after logging in;
raspistill -o image.jpgYou should see an image of the camera pop up on screen for a few seconds and then you’ll find a lovely file called image.jpg.
Now natively motion doesn’t work nicely with the camera module but some nice folks have created a port called motion-mmal that does.
To install it we just run the following;
wget https://www.dropbox.com/s/0gzxtkxhvwgfocs/motion-mmal.tar.gztar zxvf motion-mmal.tar.gzsudo ./motion -c motion-mmalcam.confAs you can see the new config file is called motion-mmalcam.conf and can (and should be) edited as required. I won’t go through that here as we already covered that in the previous post.
I promise this time that I’m going to continue on with this series and as I said last time I’m going to write a python script that will grab the weather temperature when motion takes a snapshot. From there I’ll be showing you 2 things. The first will be to set up a web page which shows an image + temperature. The second, sending the time/temperature to a 20×4 LCD screen 🙂
So stay tuned and as always you can follow me on twitter @JAGracie
1 thought on “Raspberry Pi and Motion (Weather App Pt 2) (Revised)”